
Welcome to the ReliOn Prime Glucose Meter Manual. This guide provides essential instructions for using your ReliOn Prime Blood Glucose Monitoring System effectively. It covers setup‚ testing procedures‚ and maintenance to help you manage diabetes confidently.

System Overview
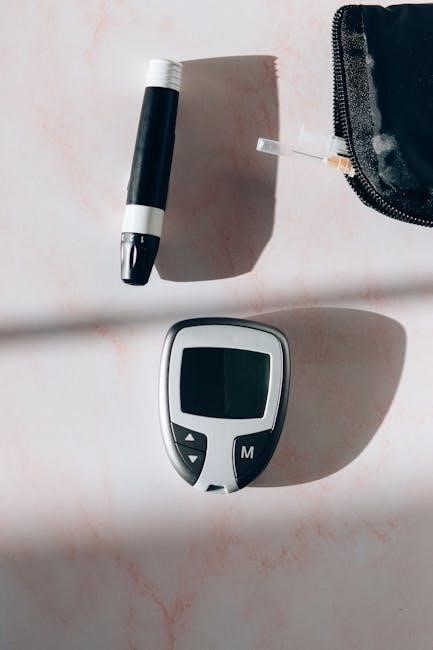
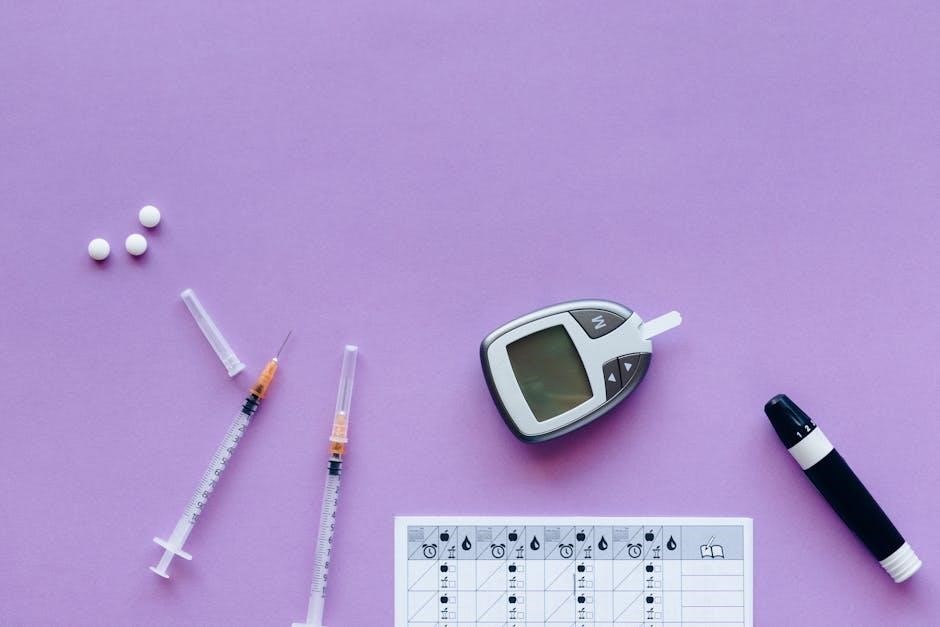
The ReliOn Prime Blood Glucose Monitoring System is designed for accurate glucose measurement using capillary blood samples from fingertips or palm. It includes a meter‚ test strips‚ and control solutions‚ ensuring reliable results for diabetes management.
Components of the ReliOn Prime System
The ReliOn Prime Blood Glucose Monitoring System consists of several essential components designed to ensure accurate and convenient glucose testing. The primary components include:
- ReliOn Prime Meter: The core device for measuring blood glucose levels‚ featuring a user-friendly interface and display screen.
- Carrying Case: A convenient storage case for the meter and accessories‚ ensuring portability and organization.
- User Instruction Manual: A comprehensive guide providing step-by-step instructions for setup‚ testing‚ and maintenance.
- Test Strips: Specifically designed for the ReliOn Prime Meter‚ these strips require only 0.5 µL of blood for accurate results.
- Control Solution: Used for verifying the meter’s accuracy and ensuring reliable test results.
- Lancing Device and Lancets: A sterile‚ single-use lancet system for obtaining blood samples safely and comfortably.
These components work together to provide a complete solution for monitoring blood glucose levels effectively. Proper use and maintenance of each part are essential for achieving accurate results and ensuring the longevity of the system.
Key Features of the Meter
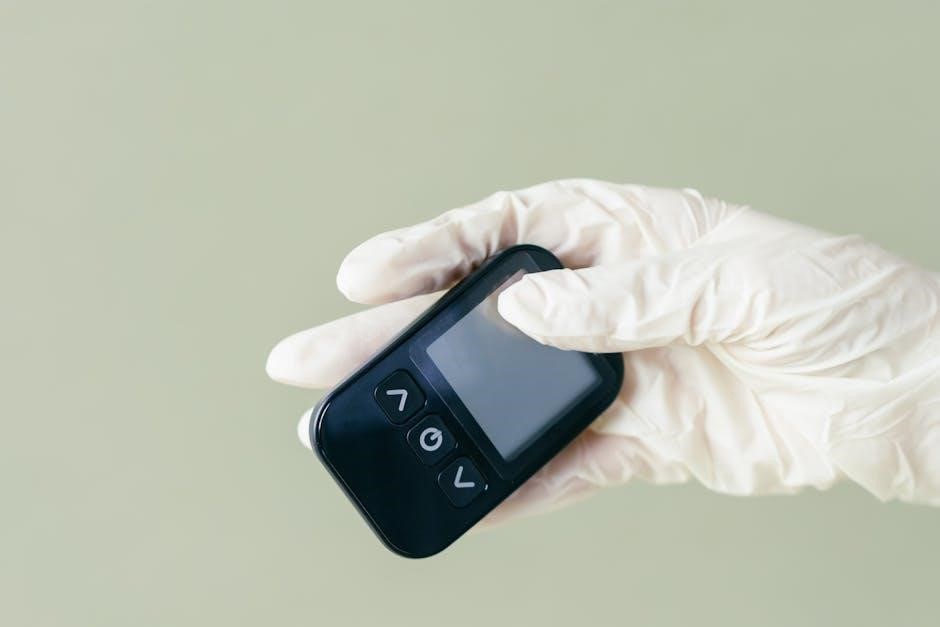
The ReliOn Prime Blood Glucose Meter is designed with user-friendly features to enhance accuracy and convenience. The meter boasts a large‚ easy-to-read display screen that shows test results‚ time‚ date‚ and error codes. It operates with a long-lasting CR2032 battery‚ providing enough power for approximately 100 tests. The meter also includes a memory function that stores up to 250 test results with dates and times‚ allowing for effective tracking of glucose levels over time. Results are displayed in just 5 seconds‚ making testing quick and efficient. Additionally‚ the meter supports alternate site testing‚ offering flexibility in blood sample collection. The system is calibrated to fresh plasma standards‚ ensuring accurate results comparable to laboratory measurements. Low battery indicators and error codes provide clear feedback‚ helping users maintain proper functionality. These features make the ReliOn Prime Meter a reliable tool for managing diabetes effectively.
Understanding the Test Strips
The ReliOn Prime Test Strips are specifically designed for use with the ReliOn Prime Blood Glucose Meter. These strips require only 0.5 microliters (µl) of blood‚ making them highly efficient and less painful for users. The test strips feature an end-fill sample application tip‚ which simplifies blood application. Once a blood drop is applied‚ the sample is drawn into the reaction site through capillary action. The glucose in the blood reacts with the enzyme on the strip‚ producing a result that the meter reads. It is crucial to handle the test strips correctly: avoid bending‚ cutting‚ or reusing them‚ as this can compromise accuracy. Always use ReliOn Prime Test Strips with the ReliOn Prime Meter‚ as they are calibrated specifically for the device. Ensure hands are clean and dry before handling strips to prevent contamination. Write the opening date on the bottle and discard strips after 90 days to maintain reliability. Proper storage and handling ensure accurate and consistent blood glucose measurements.
Blood Glucose Testing Procedures
The ReliOn Prime Meter requires a small blood sample from the fingertip or palm. Wash hands‚ lance‚ and apply a drop to the test strip. The meter reads glucose levels quickly and accurately‚ ensuring reliable results for diabetes management.
Preparing for a Blood Glucose Test
Before performing a blood glucose test with your ReliOn Prime Meter‚ ensure you are properly prepared to obtain accurate results. Start by washing your hands thoroughly with soap and warm water‚ then dry them completely. Avoid using alcohol wipes‚ as residue may affect test accuracy.
Next‚ gather all necessary materials‚ including the ReliOn Prime Meter‚ a test strip‚ and a lancing device with a new lancet. Ensure the test strips are not expired and are stored properly. Insert a new lancet into the lancing device and adjust the depth setting if needed to minimize discomfort.
Turn on the meter and ensure the display is functioning correctly. If the battery symbol is flashing‚ replace the battery before proceeding. Finally‚ choose a testing site‚ such as the side of your fingertip‚ to minimize pain. Allow the area to hang below heart level for 10-15 seconds to increase blood flow‚ then lance gently and wait for a blood drop to form.
Remember to follow all safety precautions and consult your healthcare provider if you encounter any issues during preparation.

Performing the Blood Glucose Test
Once prepared‚ insert a ReliOn Prime Test Strip into the test strip port on the meter until it clicks. Ensure the strip is correctly aligned and fully inserted. The meter will automatically turn on and display a test strip icon.
Gently press the lancing device against the selected site to obtain a blood drop. Allow the blood to form naturally; do not squeeze the area excessively‚ as this may cause inaccurate results. Once a sufficient drop forms‚ touch the tip of the test strip to the blood‚ ensuring the sample fills the reaction site completely.
The meter will begin analyzing the sample. Wait for the test result to appear on the display. The ReliOn Prime Meter provides results in just a few seconds. If an error message appears‚ refer to the troubleshooting section or consult the manual for guidance.
After obtaining your blood glucose level‚ record the result in your logbook if desired. Properly dispose of the used test strip and lancet in a biohazard container. If your reading is outside the normal range‚ consider retesting or consulting your healthcare provider.
Always follow proper safety precautions and ensure the meter is functioning correctly before each test for accurate and reliable results.
Using Control Solutions for Accuracy
Control solutions are essential for verifying the accuracy of your ReliOn Prime Meter and test strips. These solutions contain known glucose concentrations and help ensure your system is functioning correctly. Always use ReliOn Prime Control Solutions specifically designed for your meter.
To use a control solution‚ insert a test strip into the meter and apply a drop of control solution to the reaction site. The meter will display a result‚ which should fall within the range indicated on the control solution bottle. If the result is outside this range‚ refer to the troubleshooting section or contact customer support.
Store control solutions at room temperature and discard any opened bottles after the expiration date. Avoid using expired solutions‚ as this may lead to inaccurate results. Regularly testing with control solutions helps maintain the reliability of your glucose monitoring system and ensures accurate blood glucose readings.
Remember‚ control solutions are not a substitute for blood glucose tests but are a critical step in verifying the performance of your ReliOn Prime Meter. Always follow the instructions provided with your control solutions for proper use.

Alternate Site Testing
The ReliOn Prime Meter supports alternate site testing‚ allowing blood glucose tests from the palm or other approved sites. This method can reduce fingertip discomfort but requires proper preparation and blood flow to ensure accurate results.
Preparing for Alternate Site Testing
Before performing alternate site testing with your ReliOn Prime Meter‚ ensure proper preparation for accurate results. Wash your hands with soap and warm water‚ then dry thoroughly. Avoid using alcohol wipes‚ as residue may affect readings. Choose a testing site on the palm or other approved alternate locations. Allow the area to warm up by gently massaging or hanging your hand below heart level for 10-15 seconds to improve blood flow. Use the lancing device with a new lancet‚ adjusting the depth setting as needed to obtain a sufficient blood sample. Attach the clear cap for alternate site testing to the lancing device. Avoid testing on areas with scars‚ calluses‚ or poor circulation. If blood flow is insufficient‚ repeat the process or switch to a fingertip test. Always follow the manufacturer’s guidelines and consult your healthcare provider if results are inconsistent with symptoms. Proper preparation ensures reliable glucose readings for effective diabetes management.
Performing the Test at an Alternate Site
To perform a blood glucose test at an alternate site using the ReliOn Prime Meter‚ follow these steps. Turn on the meter and insert a ReliOn Prime Test Strip into the test strip port‚ ensuring it clicks into place. The meter will automatically turn on and prepare for testing. Obtain a blood sample using the lancing device with the clear cap attached for alternate site testing. Gently press the lancet against the selected site (e.g.‚ palm or forearm) and release the charger to obtain a blood drop. Allow the blood to flow naturally without squeezing the area‚ as this may cause inaccurate results. Once the blood drop forms‚ touch the tip of the test strip to the blood‚ ensuring the sample fills the reaction site. The meter will begin analyzing the sample and display the result within a few seconds. If an error occurs‚ such as insufficient blood‚ repeat the process with a new test strip. Always follow the manufacturer’s guidelines for accurate and reliable results. Proper technique ensures consistent glucose monitoring for effective diabetes management.
Memory and Display Functions
The ReliOn Prime Meter stores up to 500 test results with dates and times. The display screen shows real-time glucose readings‚ error codes‚ and battery status. It also features a test countdown and averages for tracking glucose trends effectively.
Memory Functions and Data Storage
The ReliOn Prime Meter is equipped with robust memory functions‚ storing up to 500 test results with corresponding dates and times. This feature allows users to track their glucose levels over time‚ providing valuable insights for diabetes management. The meter also enables marking of specific results‚ such as before or after meals‚ and control solution tests for better organization. Users can recall stored results easily‚ making it convenient to share data with healthcare professionals. The meter’s memory retains data even when the battery is replaced‚ ensuring no loss of information. Additionally‚ the device calculates and displays averages of glucose readings‚ helping users monitor trends and adjust their treatment plans accordingly. The memory functions are designed to be user-friendly‚ with clear navigation options to view and manage stored data. This comprehensive storage capability makes the ReliOn Prime Meter an essential tool for effective glucose monitoring and long-term health management.
Understanding the Display Screen
The ReliOn Prime Meter features a clear and intuitive display screen designed to provide essential information at a glance. The main display shows your blood glucose test results prominently‚ along with a countdown timer during testing. Additional segments on the screen include indicators for low battery‚ error codes‚ and temperature warnings. The display also shows the unit of measurement (mg/dL) and alerts for high or low results. When a test strip is inserted‚ the screen prompts you to apply blood‚ and once the test is complete‚ it displays the result along with the date and time. The screen is organized into sections‚ including a test strip icon‚ result warnings‚ and memory mode indicators. If any part of the display is missing when the meter is turned on‚ contact Customer Service at 800.631.0076 for assistance. The display is designed to be user-friendly‚ ensuring that all critical information is easily accessible and understandable.

Maintenance and Care
Regularly clean the ReliOn Prime Meter with a soft cloth and mild soap solution to prevent contamination. Store the meter in a cool‚ dry place‚ away from extreme temperatures. Avoid exposing it to moisture or direct sunlight. Handle the battery compartment with care to ensure proper function and longevity.
Cleaning the Meter
Regular cleaning of the ReliOn Prime Meter is essential to ensure accurate results and maintain its longevity. Use a soft‚ dry cloth to wipe the exterior of the meter‚ paying attention to the display screen and test strip port. For more thorough cleaning‚ dampen the cloth with mild soap solution‚ but avoid excessive moisture or harsh chemicals. Never submerge the meter in water or expose it to direct moisture‚ as this may damage the internal components.
Avoid using alcohol‚ abrasive materials‚ or strong detergents‚ as they can harm the meter’s surface or affect its performance. After cleaning‚ ensure the meter is completely dry before use. Cleaning the meter regularly helps prevent contamination and ensures reliable blood glucose readings. Always refer to the manual for specific cleaning instructions to maintain the device’s accuracy and functionality.
Storing the Meter and Accessories
Proper storage of the ReliOn Prime Meter and its accessories is crucial to maintain their functionality and longevity. Store the meter in a cool‚ dry place‚ away from direct sunlight and extreme temperatures. Avoid exposing it to humidity or moisture‚ as this may damage the internal components. The meter should be kept out of reach of children to prevent accidental damage or tampering.
Test strips should be stored in their original bottle with the cap tightly closed to maintain their quality. Write the date of opening on the bottle label and discard any unused strips after 90 days. Do not store test strips in extreme temperatures or humid environments‚ as this may affect their accuracy. Accessories like the lancing device and lancets should be stored separately in a protective case to prevent damage or contamination.
Always check the expiration dates of test strips and control solutions before use. For travel‚ store the meter and accessories in a protective case to avoid damage. Proper storage ensures the reliability and accuracy of your ReliOn Prime Glucose Meter for effective diabetes management.

Battery Information
The ReliOn Prime Meter uses a CR2032 battery. Replace it by turning off the meter‚ removing the cover‚ and inserting a new battery with the “+” side up. If changed within 30 seconds‚ memory is retained. Low battery is indicated by a flashing icon‚ allowing about 20 more tests before replacement is needed.
Changing the Battery
To ensure uninterrupted use of your ReliOn Prime Blood Glucose Meter‚ it is important to replace the battery when the low battery indicator appears. The meter uses a CR2032 lithium battery‚ which provides power for approximately 1‚000 tests. Here’s how to replace it:

- Turn off the meter to avoid losing stored data during the replacement process.
- Locate the battery compartment on the back of the meter.
- Gently pull the battery cover up to remove it.
- Take out the old battery and insert the new CR2032 battery with the “+” side facing up.
- Replace the battery cover securely.
If the battery is replaced within 30 seconds‚ the meter’s memory and settings will remain intact. However‚ if it takes longer‚ you may need to reset the time and date. A flashing low battery icon indicates only about 20 tests remain before the battery dies. Always keep spare batteries handy and avoid using damaged or expired ones. For safety‚ store batteries out of children’s reach and seek medical help immediately if a battery is swallowed.
Regularly checking the battery level ensures accurate glucose monitoring and prevents unexpected interruptions in your diabetes management routine.
Low Battery Indicators and Management
Your ReliOn Prime Blood Glucose Meter is equipped with a low battery indicator to ensure uninterrupted glucose monitoring. When the battery power is low‚ a flashing icon will appear on the display screen. This indicates that there is enough power for approximately 20 more tests before the battery needs to be replaced. It is crucial to address the low battery promptly to avoid losing important data or settings.
If the battery is replaced within 30 seconds‚ the meter’s memory and settings will remain unchanged. However‚ if the replacement takes longer or the battery is completely drained‚ you may need to reset the time and date. Always use a new CR2032 lithium battery to maintain optimal performance. Keep spare batteries handy to avoid gaps in monitoring. Additionally‚ ensure batteries are stored safely out of children’s reach‚ as they can be harmful if swallowed. Regularly monitoring the battery level and managing replacements helps maintain accurate glucose tracking and supports effective diabetes management. By staying proactive‚ you can ensure your meter is always ready for use when needed.
Troubleshooting Common Issues
Troubleshooting common issues with your ReliOn Prime Meter involves checking error codes‚ ensuring proper test strip use‚ and verifying battery life. Consult the manual or contact customer support for assistance with unresolved problems.
Identifying and Resolving Error Codes
The ReliOn Prime Glucose Meter displays error codes to indicate specific issues. These codes help users identify and resolve problems quickly. Common error codes include E-1‚ E-2‚ and LO‚ which may relate to meter malfunction‚ low battery‚ or test strip errors. To resolve these‚ turn the meter off and on again‚ ensure the test strip is properly inserted‚ or replace the battery if necessary. If the issue persists‚ consult the user manual or contact customer support for assistance. Always refer to the manual for a full list of error codes and their solutions to ensure accurate troubleshooting. Proper resolution of error codes is essential for maintaining the accuracy and reliability of your blood glucose readings. If unsure‚ seek guidance from a healthcare professional or the manufacturer’s support team. Regularly checking for error codes and addressing them promptly helps ensure optimal performance of your ReliOn Prime Meter.
Related Posts
sel 735 meter manual
SEL-735 Meter Manual: A Comprehensive Plan This manual, released January…
westinghouse 3400 psi pressure washer manual
Westinghouse WPX3400 Pressure Washer Overview The Westinghouse WPX3400 gas-powered pressure…

mdb4949skz manual
Maytag MDB4949SKZ Dishwasher: A Comprehensive Manual Guide This guide provides…